How can I disable the pop-up window about secure and non-secure items?
You can disable this Security Information pop-up window: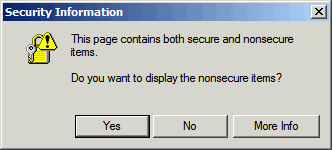
by following the steps below (for Internet Explorer 6.x. Other versions or other browsers may function differently). Please check with your IT department or network administrator before proceeding.
1. Click Tools from the top menu, then select Internet Options: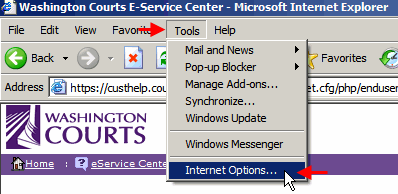
2. From the displayed Internet Options dialog box, click the Security tab, then click the Internet world globe, then click the Custom Level button.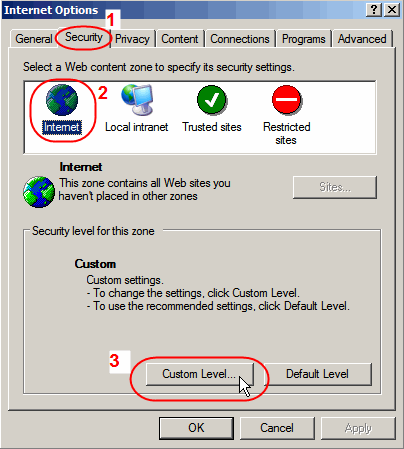
3. From the displayed Security Settings dialog box, scroll down to the Miscellaneous heading. There are two settings you may need to change:
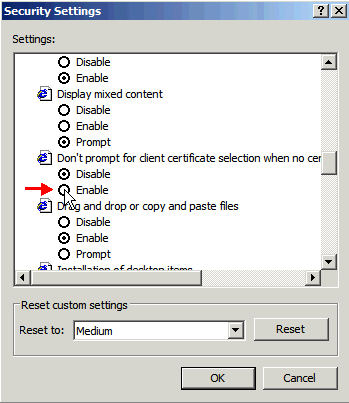
(A) Scroll down until you see the option titled: Don't prompt for client certificate selection when no certificates or only one certificate exists and click Enable as shown below:
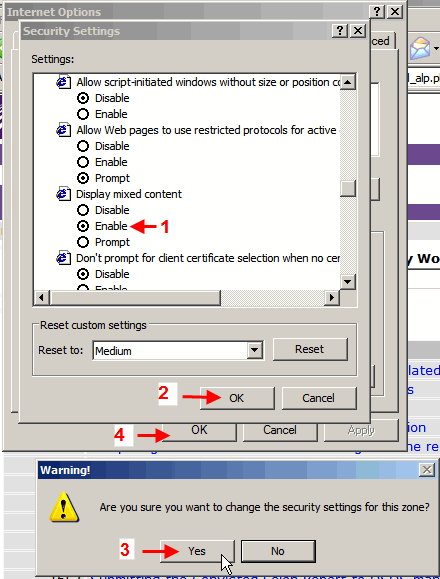
(B) Continue to scroll down (or possibly up) to the Display mixed content option. Click the Enable radio button, as shown below. Then click OK. Click Yes at the verify message. There may be a slight pause while the Security Settings dialog box closes, then click OK one more time in the Internet Options dialog box:
Result: You will no longer receive the secure/non-secure message when navigating between secure (encrypted) and non-secure (non-encrypted) Websites.
Note: In order for this change to take effect, you may need to refresh the browser screen, close your browser and re-open it, or reboot your computer.
In spite of having followed the above steps, if you continue to get security pop-up messages, you may need to also add the desired Website address(es) as Trusted Site(s). To do this:
1. From the Internet Explorer browser window, click Tools/Internet Options (Same as Step 1 above.)
2. From the displayed Internet Options dialog box, click the Security tab, then click the Trusted Sites icon (green circle with white check), then click the Sites button: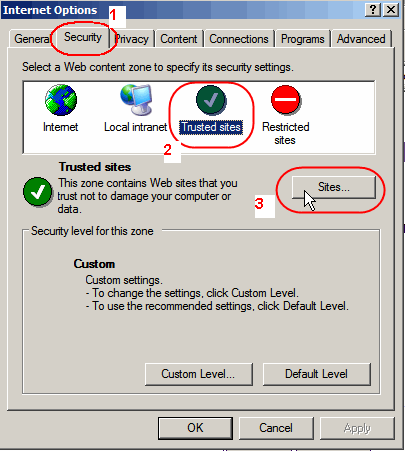
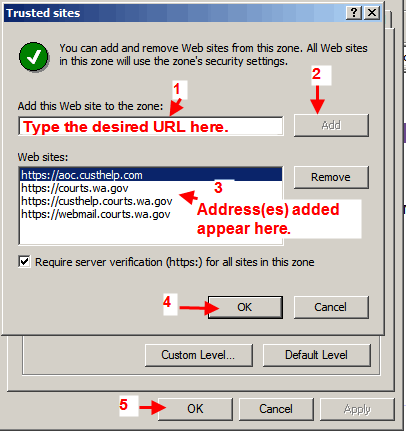
3. From the Trusted Sites dialog box, type the desired URL (Website address) for which you do NOT want to receive security messages when accessing, in the Add this Website to the zone box, then click Add. The URL entered will display in the Websites box.
Repeat this process for any other Website address(es) for which you also wish to suppress the security warning message.
Placing a check mark in the box to Require server verification (https:) for all sites in this zone is optional.
Click OK twice to return to your browser screen.
Result: You will no longer receive the secure/non-secure message when navigating between secure (encrypted) and non-secure (non-encrypted) Websites.
Note: In order for this change to take effect, you may need to refresh the browser screen, close your browser and re-open it, or reboot your computer.
If you continue to experience the security pop-up message, please use eService Center and select Topics: Computer/Printer/Security/Access, type your message in the Question Data area, and click Submit to AOC.
RN id: 868

